Sunday, August 18, 2013
Welcoming our Jersey Cow "Jewel"
So much to my husbands head shaking, I got a Jersey cow in April. She's four years old, registered, and 3 quartered cow but is still putting out 4 gallons a day on a grass diet. Her milk is amazing and we watched as the butterfat went from a pale color to a rich yellow color when she started eating knee deep beautiful green grass. Grass fed cow's milk contains more beta carotene and gives it the traditional yellow color you imagine with butter. I've tried lots of recipes and make butter, yogurt, sour cream, Devonshire cream, cheese curds, and flavored butters as a weekly chore. The extra milk goes to feed the chickens, ducks, and pigs. The pigs go crazy over the milk!

Sunday, March 10, 2013
Rendering Deer Fat to make Tallow for Soap
So now that I've got the art of soapmaking down pat I wanted to see if I could take it the most logical next homesteading step...generating the fats needed to make the soap on the farm. My husband is a deer hunter and every year we have been lucky enough to have several deer to harvest. This year I asked him to save all the fat so I could render it. He got 4 deer this year which yielded enough fat to make 3 batches so far and enough left in the freezer to make 2 more. Deer tallow combined with olive oil makes the most moisturizing bar.

Step 2. Add several inches of water to a large pot. I used my water bath canner on a turkey fryer outside in the summer kitchen because it has an unpleasant order as it cooks.
Add the ground fat to the pot.
 Step 3. Bring the pot to a boil and then turn down to a low boil.
Step 4. Once the meat is brown and the fat all melted, strain the hot liquid into a large mixing bowl. Repeat this step until all but the tiniest pieces of meat and gristle are removed.
Step 5. Set the bowl aside to cool and once room temperature you can refrigerate at it over night.

Step 7. I store the rendered fat in the freezer until needed.
 Finished Deer Soap!!
Sunday, March 3, 2013
Soap Making!!!!
The past summer we spent time in Kansas City for a veterinarian continuing education conference. At the bottom of our hotel was a little soap shop that had all sorts of handmade soap bars, herbal teas, and other scented bath items and it got me thinking about how hard it was to make soap? After all they were selling individual bars upwards of 6-7$ a bar. I knew the basics from the numerous chemistry classes I took in college, the gist of it being that if you mix sodium hydroxided (lye) with fats and oils you get soap via the process of saponifcation. I've since learned that there is a bit more to the process then you would think, but the the reward is a beautiful block of soap.
First thing I came to appreciate is that Lye is DANGEROUS, simply because it is sooooo alkaline (high pH). A healthy fear of the stuff is the best way to keep you safe. In fact, I put on safety gear from head to toe....chemical gloves, goggles, old lab coat, chemical face mask, and closed toed shoes. For some reason I was petrified to touch the stuff, but in the midst of handling it I realized that I've played with far worse chemicals in college chemistry classes and that lightened my anxiety about it.
The second thing I learned is that soap can be made from a ridiculous variety of fats and oils, ingredients I would never consider as a constituent of bar soap. Finally, I learned that those various fats and oils have different properties they add to the soap and can be combined in what seems an infinite number of ways to create a unique product each time.
Here's is what you need.
1.) Safety Gear. I bought a chemical safety setup from Lowes. It contained the eye protection, face mask, and gloves. I also used one of my old "doctor" coats.
2.) Soap mold - I went to a craft store and bought a pine rectangular unfinished wooded box. I unscrewed the lid to make it suitable. You can buy soap molds, but I decided I didn't want to invest much if it turned out I didn't like making soap. I could also turn the wooden box back into a keepsake holder. The inside measurement of my box was 2.5 inches deep, 13 inches long, and 3 inches wide. It's important to take these measurements so you can base your lye calculations for it.
2.) Fats and Oils -I decided to use some basic oils until I felt comfortable with the process. I choose to combine lard, olive oil, and coconut oil. These are all available at the grocery store. This gives a really nice balanced bar that lathers well and is mosturizing.
3.) Lye (sodium Hydroxide). In ancient times, lye was obtained my filtering water through wood ash. Today you can just go to Lowes to the drain cleaner aisle. I purchased Roebeks Crystals, which are 100% lye.
4. ) Cold Water
5.) Hand Immersion blender
6.) Large Heavy Bottom Steel Pot
7.) Large Heavy Duty Glass Mixing Bowl with a handle.
8.) Good Quality Kitchen scale that measures in fractions of ounce. Mine is by Oxo and was about $50.
Step 1.) Learn the Process. Here are a few sites I read to learn the process. Pay attention to details and follow instructions.
http://www.wholesalesuppliesplus.com/FAQ/CP-Soap-Making.aspx
Step 2.) Choose the oils you want to use. Here is a website that shows the properties of different oils.
https://summerbeemeadow.com/content/properties-soapmaking-oils
Step 3. ) Find or Make a recipe. For your first attempt keep it simple and use an established recipe. I used a lye calculator from Summer Bee Meadow .
http://summerbeemeadow.com/content/lye-calculator-and-recipe-resizer
Here was my first Recipe!!
Lard 22.75 oz (48.8%)
Olive Oil 16.36 oz (35.5%)
Coconut Oil 7.43 oz (15.97%)
Lye 6.8 oz
Water 15.89
Essential Oils of Choice 0.5cc
All measures are weights NOT volumes.
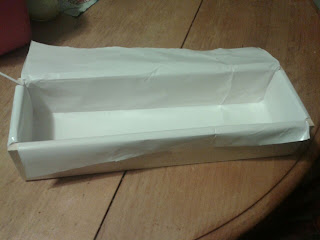 Here are some pics of my first attempts.


First thing I came to appreciate is that Lye is DANGEROUS, simply because it is sooooo alkaline (high pH). A healthy fear of the stuff is the best way to keep you safe. In fact, I put on safety gear from head to toe....chemical gloves, goggles, old lab coat, chemical face mask, and closed toed shoes. For some reason I was petrified to touch the stuff, but in the midst of handling it I realized that I've played with far worse chemicals in college chemistry classes and that lightened my anxiety about it.
The second thing I learned is that soap can be made from a ridiculous variety of fats and oils, ingredients I would never consider as a constituent of bar soap. Finally, I learned that those various fats and oils have different properties they add to the soap and can be combined in what seems an infinite number of ways to create a unique product each time.
Here's is what you need.
1.) Safety Gear. I bought a chemical safety setup from Lowes. It contained the eye protection, face mask, and gloves. I also used one of my old "doctor" coats.
2.) Soap mold - I went to a craft store and bought a pine rectangular unfinished wooded box. I unscrewed the lid to make it suitable. You can buy soap molds, but I decided I didn't want to invest much if it turned out I didn't like making soap. I could also turn the wooden box back into a keepsake holder. The inside measurement of my box was 2.5 inches deep, 13 inches long, and 3 inches wide. It's important to take these measurements so you can base your lye calculations for it.
2.) Fats and Oils -I decided to use some basic oils until I felt comfortable with the process. I choose to combine lard, olive oil, and coconut oil. These are all available at the grocery store. This gives a really nice balanced bar that lathers well and is mosturizing.
3.) Lye (sodium Hydroxide). In ancient times, lye was obtained my filtering water through wood ash. Today you can just go to Lowes to the drain cleaner aisle. I purchased Roebeks Crystals, which are 100% lye.
4. ) Cold Water
5.) Hand Immersion blender
6.) Large Heavy Bottom Steel Pot
7.) Large Heavy Duty Glass Mixing Bowl with a handle.
8.) Good Quality Kitchen scale that measures in fractions of ounce. Mine is by Oxo and was about $50.
Step 1.) Learn the Process. Here are a few sites I read to learn the process. Pay attention to details and follow instructions.
http://www.wholesalesuppliesplus.com/FAQ/CP-Soap-Making.aspx
Step 2.) Choose the oils you want to use. Here is a website that shows the properties of different oils.
https://summerbeemeadow.com/content/properties-soapmaking-oils
Step 3. ) Find or Make a recipe. For your first attempt keep it simple and use an established recipe. I used a lye calculator from Summer Bee Meadow .
http://summerbeemeadow.com/content/lye-calculator-and-recipe-resizer
Here was my first Recipe!!
Lard 22.75 oz (48.8%)
Olive Oil 16.36 oz (35.5%)
Coconut Oil 7.43 oz (15.97%)
Lye 6.8 oz
Water 15.89
Essential Oils of Choice 0.5cc
All measures are weights NOT volumes.
 Here are some pics of my first attempts.
Linning the mold with waxed paper.
 Melting the fats and oils.

Oils melted and Lye/Water made. Just waiting for the temps to come to stablize.
 Blending and watching the magic of saponification. Not quite to trace yet.


Mix in the mold and on the heating pad. Starting to solidify.
Sunday, January 13, 2013
Hello Carbonator - Goodbye Commercial Soda
I have an addiction. It is now under my control, but is still a battle at times. I LOVE SODA. What could be better then that first hit of cold soda in the morning? How it tingles, almost stings, the back of your throat and bubbles on its way down. I am almost salivating describing it. I think we all know it is bad for you. I justified my addiction by drinking "Diet" saying at least it was calorie free. I was failing to ignore the 10,000 other completely unnatural substances that make soda. I also tried to ignore the fact that when i wouldn't have a soda by at least 3pm would have a mind numbing headache. Finally, watching Fat, Sick, and Nearly Dead and several other documentaries about how the farther we go from natural foods the more we see immune mediated diseases I had to face the music and let the soda go. Honestly, it's really a "duh" moment when it happens to you. After a bit of research though I learned that I didn't have to let go of the bubbly factor....Say Hello to the Homemade Carbonator.!!
I read a great "how to" here: http://www.truetex.com/carbonation.htm
My set-Up:
My tank, regulator, hose, ball keg valve, and carbonator cap came from The Beverage Factory.

I have a 20lb tank. It costs me around $15 to have it filled an a local firehouse supply store that fills fire extinguishers. This 20 pound will likely last me well over a year and that's if I charged a liter every day. You need a carbonator cap for every bottle you want to carbonate. I use recycled 1 and 2 liter plastic soda bottles.
Water with or without Fresh Squeezed Lemon Or Lime
Homemade rootbeer using rootbeer extract and stevia
Homemade Ginger ale -boiled ginger root and sweetened with stevia herbs
Fruit Juices - especially our homemade, no added sugar Grape Juices
Wine - our homemade fruit wines- makes a new twist on Champagne
Ummm you can also carbonate hard alcohols like vodka
I read a great "how to" here: http://www.truetex.com/carbonation.htm
My set-Up:
My tank, regulator, hose, ball keg valve, and carbonator cap came from The Beverage Factory.

I have a 20lb tank. It costs me around $15 to have it filled an a local firehouse supply store that fills fire extinguishers. This 20 pound will likely last me well over a year and that's if I charged a liter every day. You need a carbonator cap for every bottle you want to carbonate. I use recycled 1 and 2 liter plastic soda bottles.
What do I carbonate???
Water with or without Fresh Squeezed Lemon Or Lime
Homemade rootbeer using rootbeer extract and stevia
Homemade Ginger ale -boiled ginger root and sweetened with stevia herbs
Fruit Juices - especially our homemade, no added sugar Grape Juices
Wine - our homemade fruit wines- makes a new twist on Champagne
Ummm you can also carbonate hard alcohols like vodka
Black Bean Chocolate Sauce
Black Bean Chocolate Sauce
The other day we were making fajitas. The meat was venison Todd had harvested, the onions and green peppers were frozen from the garden, the taco sauce was home canned, and since we didn't have any refried beans I grabbed a jar of home canned black beans. I was rinsing the beans in the sink and wondered if I could just blend up the black beans as a sort of mock refried beans. I figured the worse that could happen is I would turn them into black bean brownies if nobody liked it. As it turns out, pureed black beans make an excellent substitute for refried beans on fajitas or fajitas salads. There was about 3/4 of a jar of beans left after the meal. After staring at them for a bit, I thought it looked a bit like pudding. Then, a light bulb moment. Why couldn't it be pudding??
So I whipped out some chocolate powder and the stevia and began experimenting. Well it turned out delicious. I gave it to the kids with some sliced apples that night. They ate it all. The next day I think it tasted even better. The chocolate mellowed into the beans more and was a deeper chocolate color.
The next day the kids ate it on toast and loved it. What a great way and natural way to help my 6 year old with her constipation issues!
15 oz Can of Black Beans, drained and rinsed
1/3 cup of Milk or Almond Milk (can substitute some of this with Heavy Cream for richer flavor, but adds calories, but less carbs depending on your eating style)
1/3 cup Cocoa Powder
Stevia - powder or drops will work. The measurement is really to personal taste. This particular batch did have 1/3 cup of powder. I normally prefer the drops as they to have better flavor, but didn't have enough.
Blend until smooth in a standard blender or with an immersion blender. I used the ole regular mason jar with the blender bottom attached to it trick so I didn't have to dirty another dish. Tastes best if you refrigerate it for several hours before serving.
Eat it straight up as a pudding, dip fruit in it, or slather on whole wheat toast.

Saturday, November 24, 2012
Low Carb, Low Calorie Jambalaya
I love jambalaya and it is another food I miss making on a regular basis. Imagine that..another food I love and since I learned about cauliflower rice it has opened up a whole realm of possible alterations to my favorite recipes... This one was a wonderful success. I have always liked adding lots of extras to even my regular jambalaya so it is a complete meal and so do the same with the low carb version.
Ingredients
1 head of cauliflower - "riced" in a food processor
1 head broccoli fresh florets
1-2 large carrots thinly sliced ( or handful of baby carrots)
1/2 can of black beans, drained and rinsed
1 small package of turkey lil smokies diced or other Sausage such as polish or polska kielbasa
1 Boneless, Skinless Chicken Breasts or Thighs cut into small cubes or slices
1/2 pound Shrimp cut - shelled and deveined
1 can of Rotele
Seasoning
3 tablespoons Paprika
1 tablespoons Chili Powder
1-2 tablespoons Garlic Salt to taste
1-2 tablespoon Creole Seasoning (we love Tony Chachere's) depending on how spicy you like it.
Add an inch of water to a stock pot and bring to a boil. Add broccoli and carrots to pot and simmer for 2 minutes. Then add the chicken, shrimp, sausage, and black beans and simmer for another 2 minutes. Finally add the riced cauliflower and simmer for another 4 minutes. If excess water remains in the pot put the mix into a strainer. Then return the contents to the pot and add the can of rotele with the juice with the heat on low. Add the seasonings and combine thoroughly.

Ingredients
1 head of cauliflower - "riced" in a food processor
1 head broccoli fresh florets
1-2 large carrots thinly sliced ( or handful of baby carrots)
1/2 can of black beans, drained and rinsed
1 small package of turkey lil smokies diced or other Sausage such as polish or polska kielbasa
1 Boneless, Skinless Chicken Breasts or Thighs cut into small cubes or slices
1/2 pound Shrimp cut - shelled and deveined
1 can of Rotele
Seasoning
3 tablespoons Paprika
1 tablespoons Chili Powder
1-2 tablespoons Garlic Salt to taste
1-2 tablespoon Creole Seasoning (we love Tony Chachere's) depending on how spicy you like it.
Add an inch of water to a stock pot and bring to a boil. Add broccoli and carrots to pot and simmer for 2 minutes. Then add the chicken, shrimp, sausage, and black beans and simmer for another 2 minutes. Finally add the riced cauliflower and simmer for another 4 minutes. If excess water remains in the pot put the mix into a strainer. Then return the contents to the pot and add the can of rotele with the juice with the heat on low. Add the seasonings and combine thoroughly.

Low Carb Garlic Beef and Broccoli
I love Asian style cooking. I really love the local Chinese restaurant but their perfect sauces are chalked full of sugar and starches, so I make it at home.You can also replace the "beef" in this recipe with chicken, venison, or pork. My kids love this in spite of the heavy garlic flavor and it has become our Saturday night staple. Here's my rendition for my family of 5 and there is leftovers:
2lbs Beef - I often buy round steak or we use venison, because both are cheap and lean. Slice thinly against the grain (or direction of the muscle fibers) so it is more tender. It's easier to cut if you put it in the freezer for about 15-20 minutes to firm up the meat. I set the cut meat on paper towels to absorb the extra moisture. If you want really tender meat, sprinkle a bit of meat tenderizer on it. I occasionally use Adolfs.
2lbs Frozen Broccoli Florets- I have used both fresh and frozen florets, depending on whether or not I have any from the garden or not.
1 quart Broth - want a darker sauce use beef broth or want a lighter sauce use chicken broth. My family seems to prefer the lighter sauce so I use chicken soup base.
1/4 cup Garlic - I often used minced to save time, or freshly minced if I'm in the garden
1/4 cup Soy Sauce
1-2 Tablespoon Sesame Oil- A little sesame oil goes a long way as the flavor is powerful.
1 tablespoon Dry Powdered Ginger
A thickener ---in my non-low carb days I would reach for the cornstarch. Lately, I have been using xanthan gum. It doesn't take much and has to be used a certain way or it gets gross, see below.
Basically, steps A-B are happening at the same time.
A)Put cooking oil into a very large teflon frying pan or wok. Heat oil until hot and carefully add a piece of meat to the oil. If it immediately starts frying great if not let the oil get hotter. If you add the meat before the oil is hot, the juices won't seal into the meat and it will basically boil or steam cook instead. Don't add it all at one time. Slowly saute the beef until medium rare ( it will cook more in the sauce), then remove from pan and set aside.
B)In a small stock pot. Add the broth, garlic, soy sauce, ginger, and sesame oil. Bring mixture to just about boiling then turn down immediately and let simmer for about 5 minutes. Then gently sprinkle about 1/4 teaspoon of xanthan gum over the entire surface of the sauce, wait about 15 seconds, and then vigorously mix it in with an immersion blender or by hand if you have the speed and stamina. You can't just plop xanthan gum on the top and stir it in it will be super lumpy. Xanthan gum is also different then using cornstarch or flour as it doesn't thicken immediately, give it several minutes before you decide if it needs more thickening. Basically, repeat adding the xanthan gum 1/4 teaspoon at a time and blending until it is as thick as gravy.
C) Frozen broccoli has been blanched (or pre-cooked for a short time before it is frozen to stop enzyme action) which basically means a chunk of the cooking time is already done versus using fresh. I like to take the frozen broccoli and pour it into a microwave steamer. Microwave on high until it is unfrozen and good and hot, which in my microwave is about 7 minutes. I do recommend stirring it half way through since most microwaves have a bit of a "hot spot".
When everything is ready, mix the meat and broccoli into the thickened sauce.
This particular batch I had zucchini from the garden. Zucchini can be steamed along with the frozen broccoli or stir fried with the meat.

2lbs Beef - I often buy round steak or we use venison, because both are cheap and lean. Slice thinly against the grain (or direction of the muscle fibers) so it is more tender. It's easier to cut if you put it in the freezer for about 15-20 minutes to firm up the meat. I set the cut meat on paper towels to absorb the extra moisture. If you want really tender meat, sprinkle a bit of meat tenderizer on it. I occasionally use Adolfs.
2lbs Frozen Broccoli Florets- I have used both fresh and frozen florets, depending on whether or not I have any from the garden or not.
1 quart Broth - want a darker sauce use beef broth or want a lighter sauce use chicken broth. My family seems to prefer the lighter sauce so I use chicken soup base.
1/4 cup Garlic - I often used minced to save time, or freshly minced if I'm in the garden
1/4 cup Soy Sauce
1-2 Tablespoon Sesame Oil- A little sesame oil goes a long way as the flavor is powerful.
1 tablespoon Dry Powdered Ginger
A thickener ---in my non-low carb days I would reach for the cornstarch. Lately, I have been using xanthan gum. It doesn't take much and has to be used a certain way or it gets gross, see below.
Basically, steps A-B are happening at the same time.
A)Put cooking oil into a very large teflon frying pan or wok. Heat oil until hot and carefully add a piece of meat to the oil. If it immediately starts frying great if not let the oil get hotter. If you add the meat before the oil is hot, the juices won't seal into the meat and it will basically boil or steam cook instead. Don't add it all at one time. Slowly saute the beef until medium rare ( it will cook more in the sauce), then remove from pan and set aside.
B)In a small stock pot. Add the broth, garlic, soy sauce, ginger, and sesame oil. Bring mixture to just about boiling then turn down immediately and let simmer for about 5 minutes. Then gently sprinkle about 1/4 teaspoon of xanthan gum over the entire surface of the sauce, wait about 15 seconds, and then vigorously mix it in with an immersion blender or by hand if you have the speed and stamina. You can't just plop xanthan gum on the top and stir it in it will be super lumpy. Xanthan gum is also different then using cornstarch or flour as it doesn't thicken immediately, give it several minutes before you decide if it needs more thickening. Basically, repeat adding the xanthan gum 1/4 teaspoon at a time and blending until it is as thick as gravy.
C) Frozen broccoli has been blanched (or pre-cooked for a short time before it is frozen to stop enzyme action) which basically means a chunk of the cooking time is already done versus using fresh. I like to take the frozen broccoli and pour it into a microwave steamer. Microwave on high until it is unfrozen and good and hot, which in my microwave is about 7 minutes. I do recommend stirring it half way through since most microwaves have a bit of a "hot spot".
When everything is ready, mix the meat and broccoli into the thickened sauce.
This particular batch I had zucchini from the garden. Zucchini can be steamed along with the frozen broccoli or stir fried with the meat.

Saturday, November 10, 2012
Low Carb Italian Wedding Soup
I love Italian Wedding Soup, but it is chalked full of those evil little noodles that makes it off limits to me. This alternative turned out great and maybe even better then the real deal. This soup is really forgiving and you can really make to suit your tastes.
 Add kale (if fresh) and onions into stock pot with the broth and bring to a very gentle boil. Add spinach, swiss chard, and riced cauliflower (if fresh, if frozen wait) and boil 2-3 minutes. If you love commercial canned italian soup best, then let the greens cook longer so more mushy, but they are better for you if not cooked into oblivion. Once greens soften, turn down heat to medium and add pre-cooked chicken burgers/sausages (and/or frozen cauliflower). Add salt, pepper, and garlic to personal tastes. In about 5 -7 minutes you should be ready to go.
- 3 quarts or a 1/2 stockpot of Chicken Broth - I used chicken soup base, but homemade or boullion will work too.
- Green Onions (3) / Or Leeks (1)
- 3-5 cups of chopped Dark Greens finely chopped ( Kale, Chard, and Spinach )
- Cauliflower - 1 head or frozen bag "riced" or cut very small
- Salt
- Pepper
- Garlic (minced, dried powder, whatever you have.)
- 5-6 Chicken Burgers, or sausages - I took chicken breast, spinach, egg, and feta cheese with roasted garlic and rosemary seasoning and ran it all through our meat grinder. We originally used the mix to make burgers earlier in the week, but the leftovers worked great for this recipe. A food processor would work just find if you didnt have a meat grinder. Put the raw mix into the freezer to firm up a bit and make it more workable and then form it into patties. Cook thoroughly in the oven at 350 about 15-20 minutes or until no pink in the chicken.
 Add kale (if fresh) and onions into stock pot with the broth and bring to a very gentle boil. Add spinach, swiss chard, and riced cauliflower (if fresh, if frozen wait) and boil 2-3 minutes. If you love commercial canned italian soup best, then let the greens cook longer so more mushy, but they are better for you if not cooked into oblivion. Once greens soften, turn down heat to medium and add pre-cooked chicken burgers/sausages (and/or frozen cauliflower). Add salt, pepper, and garlic to personal tastes. In about 5 -7 minutes you should be ready to go.
Friday, November 9, 2012
No Sugar Caramel Apple Salad / Apple Dip- Great for the kids!!
Every year when Halloween comes around, I am always tempted by the beautiful caramel apples that clients often bring in. This year I almost gave in and took some home to the kids, but decided to see how they liked a low carb version first.
My mother made something from cream cheese and brown sugar when we were kids, but trying to avoid the sugar this wasn't an option. Here is what I came up with and it was a hit with my kids.
Dip
1 package of 8oz Neufchatel Cheese -Its sold next to cream cheese, but has less fat than cream cheese 23% versus 30% with a creamier texture.
8 oz of Greek Yogurt. I buy a huge container at Sam's club for about 4$.
1 tablespoon vanilla extract
Stevia Drops to personal taste
Place the neufchatel cheese into a bowl and place it into the microwave for only 15-20 sec intervals just to soften. Fold in the Greek yogurt and vanilla extract. Add 1 dropper full of stevia drops. Combine ingredients. Add additional stevia as needed to taste. Serve as dip with apple slices.
To make an excellent apple salad, cut 5-8 apples into bite size pieces. Fold the dip into the apples and mix well. The dip is a bit rich so a light coating is enough on the apple pieces. I also like to take the chocolate stevia bars I always have in the refrigerator and sliver tiny bits, it really adds something.

My mother made something from cream cheese and brown sugar when we were kids, but trying to avoid the sugar this wasn't an option. Here is what I came up with and it was a hit with my kids.
Dip
1 package of 8oz Neufchatel Cheese -Its sold next to cream cheese, but has less fat than cream cheese 23% versus 30% with a creamier texture.
8 oz of Greek Yogurt. I buy a huge container at Sam's club for about 4$.
1 tablespoon vanilla extract
Stevia Drops to personal taste
Place the neufchatel cheese into a bowl and place it into the microwave for only 15-20 sec intervals just to soften. Fold in the Greek yogurt and vanilla extract. Add 1 dropper full of stevia drops. Combine ingredients. Add additional stevia as needed to taste. Serve as dip with apple slices.
To make an excellent apple salad, cut 5-8 apples into bite size pieces. Fold the dip into the apples and mix well. The dip is a bit rich so a light coating is enough on the apple pieces. I also like to take the chocolate stevia bars I always have in the refrigerator and sliver tiny bits, it really adds something.

Low Carb Coleslaw
Love coleslaw, but don't like all the sugar??
Solution
Dressing
1/4 cup Mayonaise
1/4 Vinegar (regular, apple cider, rice...really whatever you got)
Stevia drops (I use NuNaturals ..roughly 2-3 mls, but do it to your own taste)
teaspoon Salt
teaspoon cracked Black Pepper
Simply pour over Coleslaw mix out of a bag..or if you grow your own slice a head of green cabage really thin along with some carrots.
Tastes best if you let it sit overnight.

Thursday, November 8, 2012
Homemade Healthy Popsicles
A new favorite treat around here and it doesn't get any easier!!
Pour Bolthouse Green Goodness juice into popsicle molds, freeze, and ta-da....amazing.

Pour Bolthouse Green Goodness juice into popsicle molds, freeze, and ta-da....amazing.

My kids love it. When finished the texture is almost a a bit slushy. Bolthouse makes other smoothie type drinks, but I like the idea that we are sneaking in some greens without argument.
Low Carb Chocolate Bar made with Stevia Drops
I love chocolate and it is one of the hardest things for me to to try to do without living a low carb lifestyle. So I have spent months on a the quest for the perfect way to make chocolate. I have tried numerous recipes on other blogs and pinterest but wasn't overly thrilled. Chocolate Covered Kate had the recipe with the best texture but way to dark for my liking. So far this is my current working recipe.
1 cup Coconut Oil ( I have used organic, but also just used LouAna brand as well which is significantly cheaper and was available at Walmart for around 6$ for 31.5oz)
1/2 cup of baking chocolate powder ( I use Hersheys brand)
5 mls Stevia Drops.. I use lots compared to some recipes and it still isn't as sweet as a standard hershey bar.
3 tablespoons heavy cream (optional - makes it a little less dense), I've also used evaporated milk, but that adds a bit more carbs.
I gently heat the coconut oil on the stove on the lowest setting. Be careful not to scorch anything. Coconut oil melts easily at temps as low as 80 degrees F. Once the oil is melted I add in the Stevia drops and cream or evaporated milk. I gently mix this but it doesn't completely go into a uniform solution. I then add the coco powder. I've found using my hand blender with the whisk attachment gives the most uniform chocolate at the end. I whisk the heck out of it until it starts getting thick. Using a candy thermometer bring the mixture up to 110 degrees while stirring. Let the batch cool down to about 83-85 degrees and then gently warm it back up again to about 90 degrees to temper the chocolate. This helps the chocolate be more firm at room temperature, but they still need to be stored in the refrigerator.
 Pour the mix into a chocolate bar mold and put into the refrigerator until firm.
This same chocolate mix can be used to coat things....like these frozen banana slices with and without peanut butter. Then dip the bananas into the chocolate while still in the pan...try to maintain the temperature of the chocolate. Lay them out onto a silicone bake sheet and then into the freezer until the chocolate is firm. My kids eat them as soon as they are ready, but they will keep a day or so in the refrigerator or you can keep them in the refrigerator and just set them out for a few minutes before you eat them.

You can also add goodies to your chocolate bar. I like to add unsweetened coconut (usually have to purchase from health stores or organic sections) and chopped raw almonds immediately after I pour the chocolate into the mold. My husband prefers chopped salted peanuts added to his.
1 cup Coconut Oil ( I have used organic, but also just used LouAna brand as well which is significantly cheaper and was available at Walmart for around 6$ for 31.5oz)
1/2 cup of baking chocolate powder ( I use Hersheys brand)
5 mls Stevia Drops.. I use lots compared to some recipes and it still isn't as sweet as a standard hershey bar.
3 tablespoons heavy cream (optional - makes it a little less dense), I've also used evaporated milk, but that adds a bit more carbs.
I gently heat the coconut oil on the stove on the lowest setting. Be careful not to scorch anything. Coconut oil melts easily at temps as low as 80 degrees F. Once the oil is melted I add in the Stevia drops and cream or evaporated milk. I gently mix this but it doesn't completely go into a uniform solution. I then add the coco powder. I've found using my hand blender with the whisk attachment gives the most uniform chocolate at the end. I whisk the heck out of it until it starts getting thick. Using a candy thermometer bring the mixture up to 110 degrees while stirring. Let the batch cool down to about 83-85 degrees and then gently warm it back up again to about 90 degrees to temper the chocolate. This helps the chocolate be more firm at room temperature, but they still need to be stored in the refrigerator.

This same chocolate mix can be used to coat things....like these frozen banana slices with and without peanut butter. Then dip the bananas into the chocolate while still in the pan...try to maintain the temperature of the chocolate. Lay them out onto a silicone bake sheet and then into the freezer until the chocolate is firm. My kids eat them as soon as they are ready, but they will keep a day or so in the refrigerator or you can keep them in the refrigerator and just set them out for a few minutes before you eat them.

You can also add goodies to your chocolate bar. I like to add unsweetened coconut (usually have to purchase from health stores or organic sections) and chopped raw almonds immediately after I pour the chocolate into the mold. My husband prefers chopped salted peanuts added to his.
Sunday, July 1, 2012
Japanese Beetles : Cheap Protein for Chickens and Ducks

It's no joke that commercial chicken feed has nearly doubled in price in the last 2 years alone. Even with all the garden and house scraps, the cost of raising meat birds and laying hens is almost making it too expensive to bother with. I've read that chickens, especially those in pens, love japanese beetles and with the damage they have cause on my raspberry plants in just a few days since they have emerged for the year I am all too happy to watch the chickens devour them. Here is a trap we rigged up to capture the beetles for our chickens and ducks. We placed one directly in the chicken pen where they just fall into a shallow rubber feed pan filled with a few inches of water. A second one that is closer to our raspberries, they fall into a 5 gallon bucket that also has a few inches of water in. The goal when placing near a heavily infested area is to get close enough to draw them away from the plants u want to protect or you end up attracting more. The five gallon bucket style one needs to be dumped a few times a day or there gets to be so many that they climb on each other and start flying back out. We seem to be catching an enormous amount. I am hoping between the japanese beetles, duck weed, and garden produce that maybe for at least 2 months we won't have to buy food. Someone suggested freezing them for use at other months, but I just don't think I can stomach bags of dead beetles in my freezers, even an old one devoted to that.


Saturday, May 26, 2012
The Haskap
Last year we added Haskaps. They are cultivated versions of the honeyberry. The fruit is elongated in shape and deep purple and basically whatever you can do with a blueberry you can do with a haskap.

 We started with 3 tundra plants and 2 pollinators from Jung's. Originally, I had plans to keep them out in the field, but the hard clay soil seemed too much for them. I moved them all very early this spring into a raised bed filled with horse manure compost. They simply took off in the compost. I was even amazed that they flowered very early this spring and put on fruit, despite the flowers being exposed to several frosts. The flowers were a very soft yellow and looked like other flowers in the honeysuckle family. The fruit is said to riped earlier then strawberries and this turned out to be our experience as well. Our first "crop" was small only about 15 -20 berries, but they ripened almost 2 weeks or more ago and the strawberries are just starting to turn. We found the flavor slightly tart, but very similar to a blueberry and good just fresh. I have a feeling no matter how many I plant they won't make it into the house.

 We started with 3 tundra plants and 2 pollinators from Jung's. Originally, I had plans to keep them out in the field, but the hard clay soil seemed too much for them. I moved them all very early this spring into a raised bed filled with horse manure compost. They simply took off in the compost. I was even amazed that they flowered very early this spring and put on fruit, despite the flowers being exposed to several frosts. The flowers were a very soft yellow and looked like other flowers in the honeysuckle family. The fruit is said to riped earlier then strawberries and this turned out to be our experience as well. Our first "crop" was small only about 15 -20 berries, but they ripened almost 2 weeks or more ago and the strawberries are just starting to turn. We found the flavor slightly tart, but very similar to a blueberry and good just fresh. I have a feeling no matter how many I plant they won't make it into the house.
Saturday, March 3, 2012
Uses for Your Canned Tomato Puree: Salsa

In the middle of winter, I crave fresh tasting salsa. I have tried canning "already made salsa" and found it to be lacking in flavor and it really tasted no better then a quality jar of salsa you would find in the grocery store. The biggest problem is I don't really like the flavor of cooked salsa in general. Store bought "fresh "tomatoes in the winter are however just as gross. What do you do?? I took a quart jar of plain home canned tomato puree from the cellar and to that added lots of fresh cilantro, a medium fresh onion,a green pepper, 3 garlic cloves, lime juice from half of a fresh lime, and salt to taste. Screw the bottom of your blender into the top of the jar....blend until the fresh bits are chopped up nice and small and....Ta-daaaaaaa..... A fresh tasting salsa and another use for those tomatoes you spent all summer saving.
Capturing Life in Plaster


I first tried this in salt dough after seeing it on pinterest, but was very disappointed by the results. The salt dough needs to be put in the oven at 200 degrees F for upwards of 4 -5 hours. If you are trying to do an older childs foot it may take longer. The results were not detailed and didn't cover well with paint. There is also no consensus on how long salt dough anything lasts. I wanted to capture the kids youth for ages, or at least until my older years. All in all...i don't recommend using salt dough for footprints.
I read numerous websites and took a bit of good information from each. After a bit of trial and error, found that plaster of paris was the best medium for capturing life like and detailed foot and handprints. The best technique I have found is as follows:
**Playdough ---I used generic, in fact I tried both name brand and the cheaper generic from the craft aisles at Walmart and the generic was not only cheaper it worked better, The generic playdough peeled away from the plaster much better after the plaster dried and any that remained rinsed away easily in warm water.
**Plaster of Paris - I bought a 25 lb bag for 11$ at the local hardware store.
**2 foot long length of 1 inch wide cardstock covered in packing tape to "laminate" it
**Paint
1.)I used 3 standard size playdough containers and rolled it out so that it was at least 3/4 of an inch thick and dimensions large enough to house the foot or hand with plenty of space around it.
You can have the print have a slight irregular edge of plaster (skip to step 5) or it can be made so the entire piece has a circular shape with the print protruding from the center (Follow steps 2 to 4)
2.)Place the cardstock strip in a circle around the impression. Use a paper clip to hold the paper at the proper length.
3.)When you have the paper centered around the print the way that you like it then press it into the playdough enough to so it stays in place.
4.) If you want a hole in the final product to hang it up, then take a straw or a plastic standard pen and stick the end of it into the playdough where you want the hole to be.
4.) Mix the plaster. I use about 1 cup of plaster to 1/2 cup of cold water per small size impression. Stir the plaster to remove the lumps and as many air bubbles as possible.
5.) Pour the plaster into the paper mold so it is around 1/2 inch thick.
6.) Remove the pen in about 40 mins.
7.) Remove the paper mold in about 60 minutes. Touch the back of the plaster, if it doesn't leave a mark then pick u the plaster and pull the playdough off. It can be reused.
8.) Allow the plaster to dry an additional 20 minutes then wash the surface of the print in warm water to remove the playdough residue. Be gentle.
9.) Allow the print to dry for several hours.
10.) Paint as desired. I love bronze spray paint.
Sunday, February 5, 2012
Prepare Ahead :Fish and Fresh Veggies
Prepare Ahead and Toss it in the Oven: Fish and Fresh Veggies
I am so blessed to have a dad with a serious fishing addiction. We basically have an unlimited supply of walleye, blue-gills, and crappies. In fact, I just bought fish for the first time in a long while and was amazed at how much the fish my dad so willingly gives us would cost at the store. Regardless, just about any fish will work for this but my favorites for store bought fish would be either tiliapia or salmon, although each has a completely different flavor.
The recipe is easy. I don't tend to make sides with this dinner because the point is it is supposed to be a super easy, healthy meal so go big when you are considering the size pan. The fish and vegetables tend to "cook down" a lot. I will generally use a 9X 13 pan which equates into 2-3 lbs of fish for our family.
Fresh Tomato, sliced 1/4 inch
Red Onion, sliced
Green or Colored Sweet Peppers, sliced
1/2 Lemon or 1 Lime, sliced
Sliced Mushroom
Optional depending on season
**Zucchini, sliced
**Asparagus
5 Butter Pads
Lemon Pepper to taste
Garlic Salt to taste
Remove the filets from the package and briefly rinse under cold water. Pat them dry and lay all along the bottom of a 9 X 13 pan. I don't grease the pan. Cover with your vegetables slices. I don't tend to do this in a particular order. Sprinkle with lemon pepper and garlic salt to taste. You can store it for several days in the refrigerator before cooking. I usually make it on Sunday and we have it on tuesday nights. Turn oven to 350 F and put the glass container in. I let them warm up to together to prevent cracking the glass dish. I will also cover with tinfoil if i have asparagus in it or a really thick layer of vegetables to help everything get done. In our stove, the fish is done in about 25 -30 minutes. Just check to make sure the fish is no longer translucent if a white fish and flakes apart.
Tuesday, January 31, 2012
Healthy Low Carb Prepare Ahead Meals - Chicken Mediterranean

We have been actively trying to eat better...specifically more fresh vegetables and a bigger selection of vegetables. The more journals I read the more saddened I am by the amount of disease in this country that is the direct result of our poor nutrition.
The biggest problem is availability and cost. We are spoiled in the summer by simply eating out of the garden, but winter in Iowa doesn't allow for shopping local for fresh produce. So unfortunately the best looking and best priced produce comes from...Sam's club. I feel horrible just saying typing that. Regardless...buying fresh in bulk has it's advantages...it's cheaper?? Yikes, however the locally owned grocery store can be very hit or miss on how the fresh produce and with 3 kids I can't brave a million stores. Coming up with convenient, healthy, prepare ahead recipes that actually use up the bulk produce with little waste is possible. If you can find about an hour on Sunday, you can make several dinners that keep several days in the refrigerator.
Sorry, I hate following the directions for recipes, use it as a guideline, but alter to your families taste.
Chicken Mediterranean
Boneless, Skinless Chicken Breast ( I figure 1 per person, since we don't have a starch with this meal
Roma Tomatoes, diced
Mushrooms, cleaned sliced (8oz)
Green Onions , diced ( I use about 6)
Black Olives, sliced
Red, Orange, or Yellow Sweet Peppers (1 large, or 4-5 small)
Fresh Kale, chopped finely (2-3 leaves)
Optional : fresh asparagus pieces
Fresh minced garlic (2 tablespoons)
shredded mozzarella
Butter/ or Olive Oil - (4 tablespoons)
Preheat oven to 350 F.
Butterfly chicken breasts if thick, I aim for a thickness of about 1/2 inch. Place them along the bottom of a glass baking pan. Sprinkle mozzarella on top of chicken breasts. Spread the veggies on top of cheese layer, no particular order. Place the pads of butter evenly around the pan. Sprinkle with garlic, salt, and pepper to taste. Cover with tin foil. Bake for about 20 minutes or until chicken juices are no longer pink and vegetables tender.
The biggest problem is availability and cost. We are spoiled in the summer by simply eating out of the garden, but winter in Iowa doesn't allow for shopping local for fresh produce. So unfortunately the best looking and best priced produce comes from...Sam's club. I feel horrible just saying typing that. Regardless...buying fresh in bulk has it's advantages...it's cheaper?? Yikes, however the locally owned grocery store can be very hit or miss on how the fresh produce and with 3 kids I can't brave a million stores. Coming up with convenient, healthy, prepare ahead recipes that actually use up the bulk produce with little waste is possible. If you can find about an hour on Sunday, you can make several dinners that keep several days in the refrigerator.
Sorry, I hate following the directions for recipes, use it as a guideline, but alter to your families taste.
Chicken Mediterranean
Boneless, Skinless Chicken Breast ( I figure 1 per person, since we don't have a starch with this meal
Roma Tomatoes, diced
Mushrooms, cleaned sliced (8oz)
Green Onions , diced ( I use about 6)
Black Olives, sliced
Red, Orange, or Yellow Sweet Peppers (1 large, or 4-5 small)
Fresh Kale, chopped finely (2-3 leaves)
Optional : fresh asparagus pieces
Fresh minced garlic (2 tablespoons)
shredded mozzarella
Butter/ or Olive Oil - (4 tablespoons)
Preheat oven to 350 F.
Butterfly chicken breasts if thick, I aim for a thickness of about 1/2 inch. Place them along the bottom of a glass baking pan. Sprinkle mozzarella on top of chicken breasts. Spread the veggies on top of cheese layer, no particular order. Place the pads of butter evenly around the pan. Sprinkle with garlic, salt, and pepper to taste. Cover with tin foil. Bake for about 20 minutes or until chicken juices are no longer pink and vegetables tender.
Saturday, October 29, 2011
Things for the farm

So after over 4 years since leaving Ames, we finally sold the Nevada house...Thank the heavens!!
Selling the house allowed us to purchase some badly needed items for the farm like a nice snowblower, drill, and saw and a few things to just make life easier!!! Like our super awesome pull behind tiller purchased at Sears. Tilled 6 of our garden beds in less then 30 minutes and most of that was devoted to the learning curve. Can't wait to really test it out next year!!!
So I got a little busy....
I had great ambitions to keep this blog up to date....alas....busy.... but we did have a lot on our plates including the addition of Mason Owen into our family in July. His birth was a bit dramatic and involved being sent home from the hospital only to deliver him myself in the front seat of our minivan with my husband driving us to the hospital. Yikes..oh well...we all did well and he is a sweet, happy, healthy baby.

What happened on the farm??
The Carmine Jewel Cherries have done phenomenal, despite our hard pack clay dirt. They literally went from twigs to about 2 foot tall!! So excited. The other interesting thing we noticed is they were unphased by the japanese beetles. Unfortunately, the nanking cherries didn't fair as well and were completely defoliated by the beetles. Prior to the beetles they also went from a twig to nice bushy little 1.5 foot high plants. Honeyberries are in and living, but not thriving like the cherries. Goumi has also out done the honeyberry plants. Will likely do some more soil amendments with manure next year.
Other news from this summer include the addition of a cow and selling a horse. After much debate over the years, I finally gave into the fact that I don't have time for a young horse...and it only took me six years to figure that out. Kayla found a wonderful home with a young girl who just graduated from college and is planning to do dressage and eventing with her. I will say having only the 2 horses has changed they dynamic of the barn completely, much calmer and quieter and much less competition. Also much less poo to clean up!!. So I sold a horse but added a cow. My reasoning is I don't have to feel quilty about not riding the cow and at the end of the day I could always eat the cow. After looking and looking, I finally found a miniature Hereford heifer we could afford. We decided our future herd would be named based on gemstones an d jewels and so our first little cow is Ruby. The plan is to breed her in about a year to something small...maybe a miniature jersey...if we got a heifer it could be a good little milk cow. Althoug
 h, there is nothing to stop me from milking the hereford for table milk.
 d jewels and so our first little cow is Ruby. The plan is to breed her in about a year to something small...maybe a miniature jersey...if we got a heifer it could be a good little milk cow. Althoug
 h, there is nothing to stop me from milking the hereford for table milk.
Subscribe to:
Posts (Atom)